In the Microsoft world, there are two colorspaces that we're concerned about: YUV and RGB.
RGB Color Space
RGB is generally the easiest colorspace to visualize, since most of us have dabbled with finger paints or crayons. By mixing various amounts of red, green, and blue, the result is a broad spectrum of colors. Here is a simple illustration to convey this colorspace:
 The top image of the barn is what you see. Each of the three pictures below are the red, green and blue components, respectively. When you add them together, voila, you get barnyard goodness. (sidenote: because you "add" colors together in the RGB colorspace, we call this an "additive" color model)
In the digital world, we have a convenient representation for RGB. Typically 0, 0, 0 corresponds with black (i.e. red, green and blue values are set to 0), and 255, 255, 255 is white. Intermediate values result in a large palette of colors. A common RGB format is RGB24, which allocates three 8 bit channels for red, green, and blue values. Since each channel has 256 possible values, the total number of colors this format can represent is 256^3, or 16,777,216 colors. There are also other RGB formats that use less/more data per channel (and thus, less/more data per pixel), but the general idea is the same. To get an idea of how many RGB formats exist, one need not go any farther than fourcc.org.
Despite the multitude of RGB formats, in the MSFT world, you can basically count on dealing with RGB24 or RGB32. RGB32 is simply RGB24, but with 8 bits devoted to an "alpha" channel specifying how translucent a given value is.
YUV Color Space
YUV is a substantially different from RGB. Instead of mixing three different colors, YUV separates out the luminance and chroma into separate values, whereas RGB implicitly contains this information in the combination of its channels. Y represents the luminance component (think of this as a "black and white" channel, much like black and white television) and U and V are the chrominance (color) components. There are several advantages to this format over RGB that make it desirable in a number of situations:
- The primary advantage of luminance/chrominance systems such as YUV is that they remain compatible with black and white analog television.
- Another advantage is that the signal in YUV can be easily manipulated to deliberately discard some information in order to reduce bandwidth.
- The human eye is more sensitive to luminance than chroma; in this sense, YUV is generally considered to be "more efficient" than RGB because more information is spent on data that the human eye is sensitive to.
- It is more efficient to perform many common operations in the YUV colorspace than in RGB--for example, image/video compression. By nature, these operations occur more easily in a YUV colorspace. Often, the heavy lifting in many image processing algorithms is applied only to the luminance channel.
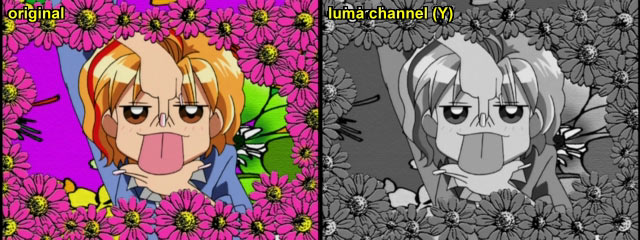
Original image on the left, and the single Y (luminance) channel on the right:
...And here are the U and V channels combined:
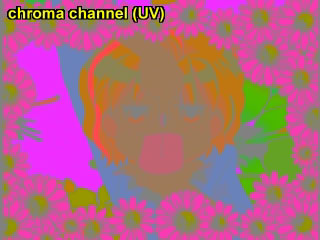
Notice that the Y channel is simply a black and white picture. All of the color information is contained in the U and V channels.
Like RGB, YUV has a number of sub-formats. Another quick trip to fourcc.org reveals a plethora of YUV types, and Microsoft also has this article on a handful of the different YUV types used in Windows. YUV types are even more varied than RGB when it comes to different format.
The bad news is there's a lot of redundant YUV image formats. For example, YUY2 and YUYV are the exact same format entirely, but merely have different fourcc names. YUY2 and UYVY are exactly the same thing (16 bpp, "packed" format) but merely have the per-pixel byte order reversed. IMC4 and IMC2 are exactly the same thing (both 12 bpp, "planar" formats) but merely have the U and V "planes" swapped. (more on planar/packed in a moment)
The good news is that it's pretty easy to go between the different formats without too much trouble, as we'll demonstrate later.
Packed/Planar Image Formats
The majority of image formats (in both the RGB and YUV colorspaces) are in either a packed or a planar format. These terms refer to how the image is formatted in computer memory:
- Packed: the channels (either YUV or RGB) are stored in a single array, and all of the values are mixed together in one monolithic chunk of memory.
- Planar: the channels are stored as three separate planes. Fo

This is YUY2. Notice that the different Y, U, and V values are simply alongside one another. Also note that the above represents six pixels. They are not segregated in memory in any way. RGB24/RGB32/YUV2 are all examples of packed formats.
This image shows a planar format:

This is YV12. Notice that the three planes have been separated in memory, rather than being in a single, monolithic array. Often times this format is desirable (especially in the YUV colorspace, where the luminance values can then easily be extracted). YV12 is an example of a planar format.
Converting Between Different Formats in the Same Color Space
Within a given colorspace are multiple formats. For example, YUV has multiple formats with differing amounts of information per pixel and layout in memory (planar vs. packed). Additionally, you may have different amounts of information for the individual Y, U, and V values, but most Microsoft formats typically allocate no more than 8 bits per channel.
As long as the Y, U, and V values for the source and destination images have equivalent allocation, converting between various YUV formats is reduced to copying memory around. For this section we'll deal with YUV formats, since RGB will follow the same general principles. As an example, let's convert from YUY2 to AYUV.
YUY2 is a packed, 16 bits/pixel format. In memory, it looks like so:
The above would represent the first six pixels of the image. Notice that each pixel ends up with a Y value, and every other pixel contains a U and a V value. There is no alpha channel. The image contains a 2:1 horizontal down sampling.
A common misconception is that the # of bits per pixel is directly related to the color depth (i.e. the # of colors that can be represented). In YUY2, our color depth is 24 bits (there are 2^24 possible color combinations), but it's only 16 bits/pixel because the U and V channels have been down sampled.
AYUV, on the other hand, is a 32 bits/pixel packed format. Each pixel contains a Y, U, V, and Alpha channel. In memory, it ends up looking like so:

The above would represent the first three pixels of the image. Notice that each pixels has three full 8 bit values for the Y, U and V channels. There is no down sampling. There is also a fourth channel for an alpha value.
In going from YUY2 to AYUV, notice that the YUY2 image contains 16 bits/pixel whereas the AYUV contains 32 bits/pixel. If we wanted to convert from YUY2 to AYUV, we have a couple of options, but the easiest way is to simply reuse the U and V values contained in the first two pixels of the YUY2 image. Thus, we have to do no interpolation at all to go from YUY2 to AYUV--it's simply a matter of re-arranging memory. Since all the values are 8 bit, there isn't any additional massaging to do; they can simply be reused as is.
Here is a sample function to converty YUY2 to AYUV:
// Converts an image from YUY2 to AYUV.  Input and output images must
// be of identical size.  Function does not deal with any potential stride
// issues.
HRESULT ConvertYUY2ToAYUV( char * pYUY2Buffer, char * pAYUVBuffer, int IMAGEHEIGHT, int IMAGEWIDTH )
{
    if( pYUY2Buffer == NULL || pAYUVBuffer == NULL || IMAGEHEIGHT < 2
        || IMAGEWIDTH < 2 )
    {
        return E_INVALIDARG;
    }

    char * pSource = pYUY2Buffer;  // Note: this buffer will be w * h * 2 bytes (16 bpp)
    char * pDest = pAYUVBuffer;  // note: this buffer will be w * h * 4 bytes (32 bpp)
    char Y0, U0, Y1, V0;    // these are going to be our YUY2 values

    for( int rows = 0; rows < IMAGEHEIGHT; rows++ )
    {
        for( int columns = 0; columns < (IMAGEWIDTH / 2); columns++ )
        {
            // we'll copy two pixels at a time, since it's easier to deal with that way.
            Y0 = *pSource;
            pSource++;
            U0 = *pSource;
            pSource++;
            Y1 = *pSource;
            pSource++;
            V0 = *pSource;
            pSource++;

            // So, we have the first two pixels--because the U and V values are subsampled, we *reuse* them when converting
            // to 32 bpp.
            // First pixel
            *pDest = V0;
            pDest++;
            *pDest = U0;
            pDest++;
            *pDest = Y0;
            pDest += 2; // NOTE: not sure if you have to put in a value for the alpha channel--we'll just skip over it.

            // Second pixel
            *pDest = V0;
            pDest++;
            *pDest = U0;
            pDest++;
            *pDest = Y1;
            pDest += 2; // NOTE: not sure if you have to put in a value for the alpha channel--we'll just skip over it.
        }
    }

    return S_OK;
}
Note that the inner "for" loop processes two pixels at a time.
For a second example, let's convert from YV12 to YUY2. YV12 is a 12 bit/pixel, planar format. In memory, it looks like so:
...notice that every four pixel Y block has one corresponding U and V value, or to put it a different way, each 2*2 Y block has a U and V value associated with it. And, yet another way to visualize it: the U and V planes are one quarter the size of the Y plane.
Since all of the YUV channels are 8 bits/pixel, again--it comes down to selectively moving memory around. No interpolation is required:
// Converts an image from YV12 to YUY2.  Input and output images must
// be of identical size.  Function does not deal with any potential stride
// issues.
HRESULT ConvertYV12ToYUY2( char * pYV12Buffer, char * pYUY2Buffer, int IMAGEHEIGHT, int IMAGEWIDTH )
{
    if( pYUY2Buffer == NULL || pYV12Buffer == NULL || IMAGEHEIGHT < 2
        || IMAGEWIDTH < 2 )
    {
        return E_INVALIDARG;
    }

    // Let's start out by getting pointers to the individual planes in our
    // YV12 image.  Note that the Y plane in a YV12 image's size is
    // simply the image height * image width.  This is because all values
    // are 8 bits.  Also notice that the U and V planes are one quarter
    // the size of the Y plane (hence the division by 4).
    BYTE * pYV12YPlane = pYV12Buffer;
    BYTE * pYV12VPlane = pYV12YPlane + ( IMAGEHEIGHT  * IMAGEWIDTH );
    BYTE * pYV12UPlane = pYV12VPlane + ( ( IMAGEHEIGHT  * IMAGEWIDTH )  / 4 );

    BYTE * pYUV2BufferCursor = pYUV2Buffer;

    // Keep in mind that YV12 has only half of the U and V information that
    // a YUY2 image contains.  Because of that, we need to reuse the U and
    // V plane values, so we only increment that buffer every other row
    // of pixels.
    bool bMustIncrementUVPlanes = false;

    for( int ImageHeight = 0; ImageHeight < IMAGEHEIGHT; ImageHeight++ )
    {
        // Two temporary cursors for our U and V planes, which are the weird ones to deal with.
        BYTE * pUCursor = pYV12UPlane;
        BYTE * pVCursor = pYV12VPlane;

        // We process two pixels per pass through this equation,
        // hence the (IMAGEWIDTH/2).
        for( int ImageWidth = 0; ImageWidth < ( IMAGEWIDTH / 2 ) ; ImageWidth++ )
        {
            // first things first: copy our Y0 value.
            *pYUY2BufferCursor = *pYV12YPlane;
            pYUY2BufferCursor++;
            pYV12YPlane++;

            // Copy U0 value
            *pYUY2BufferCursor = *pUCursor;
            pYUY2BufferCursor++;
            pUCursor++;

            // Copy Y1 value
            *pYUY2BufferCursor = *pYV12YPlane;
            pYUY2BufferCursor++;
            pYV12YPlane++;

            // Copy V0 value
            *pYUY2BufferCursor = *pVCursor;
            pYUY2BufferCursor++;
            pVCursor++;
        }

        // Since YV12 has half the UV data that YUY2 has, we reuse these
        // values--so we only increment these planes every other pass
        // through.
        if( bMustIncrementUVPlanes )
        {
            pYV12VPlane += IMAGEWIDTH / 2;
            pYV12UPlane += IMAGEWIDTH  / 2;
            bMustIncrementUVPlanes = false;
        }
        else
        {
            bMustIncrementUVPlanes = true;
        }
    }

    return S_OK;
}
This code is a little more complicated than the previous sample. Because YV12 is a planar format and contains half of the U and V information contained in a YUY2 image, we end up reusing U and V values. Still, the code itself isn't particularly daunting.
One thing to realize: neither of the above functions are optimized in any way, and there are multiple ways of doing the conversion. For example, here's an in-depth article about converting YV12 to YUY2 and some performance implications on P4 processors. Some people have also recommended doing interpolation on pixel values, but in my (limited and likely anecdotal) experience, it doesn't make a substantial difference.

No comments:
Post a Comment